✨Updated feature alert
This feature is available from Tuesday, 31st March 2026.
Overview
A Placement represents the learner’s place of work or training location while completing their apprenticeship. Placements store key employer and site details and can be assigned during learner account creation or updated later via the Episode tab. Placement Types were introduced on 31st March 2026 to better align Eportfolio with the employer structure in Onefile’s Enrol Onboarding system.
User Roles
This feature can be used by the following user roles:
- Centre Manager
- User Manager
How to Create a Placement
- Click Centre in the navigation menu.
- Click Placements.
- Click Create Placement.
- Enter the Placement Name and Address.
- Select the Placement Type (see below).
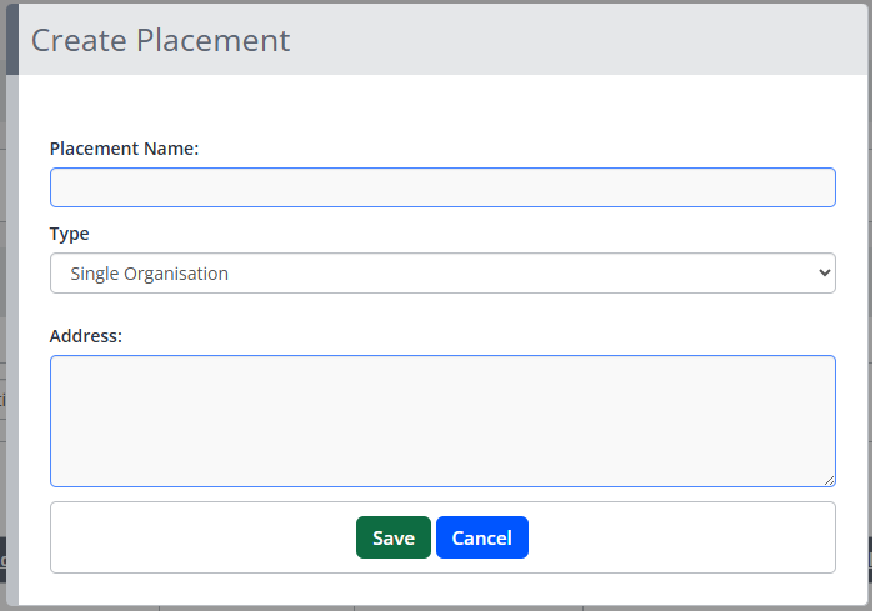
- Click Save.
Placements can be assigned to a learner during account creation and can be updated at any time via the learner’s Episode tab.
Placement Types
Introduced on 31st March 2026, Placement Types help you organise employers more effectively.
- Single Organisation – a standalone placement.
- Branch – a placement linked to a parent Registered Office.
- Registered Office – a parent placement that can have multiple branches linked.
Placement Type Rules
- You cannot save a Branch without selecting a Registered Office.
- A Registered Office cannot be changed to another type if it already has branches linked.
- All existing placements were automatically set to Single Organisation in the update.
Changes You Will See
Placements Grid
- A new Type column.
- A Branches column displaying the number of branches linked to each Registered Office.
Creating a Placement
- You can select the Placement Type during creation.
- The default type is Single Organisation.
- If you choose Branch, you must select a Registered Office.
Editing a Placement
- You can update Placement Types where appropriate.
- Restrictions apply if the placement already has linked branches.
Additional Placement Information
Once a Placement has been created, you can add further optional details:
- Contact Name
- Telephone Number
- Telephone Extension
- Website
- Fax
- MIS Value (if enabled)
If you have permission to Manage Placement Documents, a document section will be available where you can upload files and set expiry dates.
Custom Terminology
If your organisation uses alternative language, you can rename:
- Single Organisation
- Branch
- Registered Office
These labels can be updated in your Centre Settings.
Tips & Notes
- Top Tip: Create your Registered office then Branches.
- Top Tip: At the top of each Placement page, you can create Observer and Employer accounts linked to that Placement.
- Keeping Placement details up to date ensures accurate reporting and communication.
- Centre Managers and User Managers can edit Placements at any time.
Terminology
The terminology used in this article may vary depending on your Centre’s configuration.
Related Articles
Need Help?
If you encounter any issues or have questions, please contact Onefile Support or your internal support team.